
One of the primary visual hooks I wanted in my Zombie Action Driving Game was to enable the player to plow through large numbers of zombies and have their bodies fly all over the place from the impact. I plan to have 500+ zombies active in the scene simultaneously, so I needed to optimize my ragdoll implementation for performance. Having all those colliders and rigid bodies continuously enabled would be too costly and slow down the game.
In this tutorial, I will show you how to Spawn Ragdolls in Unity in an optimized way by only triggering the ragdoll when needed.
Overview of Approaches
When a character dies in a game, there are two main approaches to handling the visuals: animations and ragdolls.
- Animations – Precise control over the look of deaths, but can get repetitive with the same motions each time. Lots of death animations would be needed to avoid this, increasing work.
- Ragdolls – Powered by the physics system for more dynamic, randomized deaths. However, having 500+ ragdolls with colliders/rigid bodies continuously active would tank performance.
The approach I implemented spawns ragdolls on-demand only when a zombie dies. This activates the desired randomization and variety of physics-powered deaths while optimizing performance by temporarily enabling ragdolls during deaths.
I take a snapshot of the position/rotation of the zombie, create the ragdoll with the same position/rotation, and then apply force to the ragdoll to propel it in the appropriate direction. This approach achieves the desired visual result without negatively impacting performance.
In the following sections, I’ll explain this approach in more detail…
Step 1 – How To Spawn a Ragdoll
The first step is to create the ragdoll. Click “Game Object” from the unity menu at the editor’s top and select 3d object – > Ragdoll. Next, the ragdoll wizard window will open. Drag the body parts from your model into the body part area on the wizard window. If you are unsure which body part to drag, you can click on the object in the hierarchy and it will show you the location of the pivot point on the model in the scene view.
When all are assigned, click the “Create” button at the bottom right.
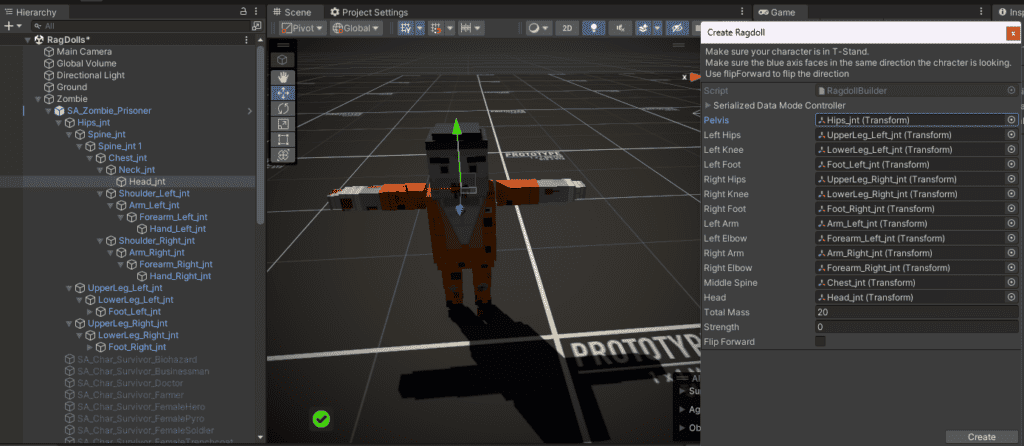
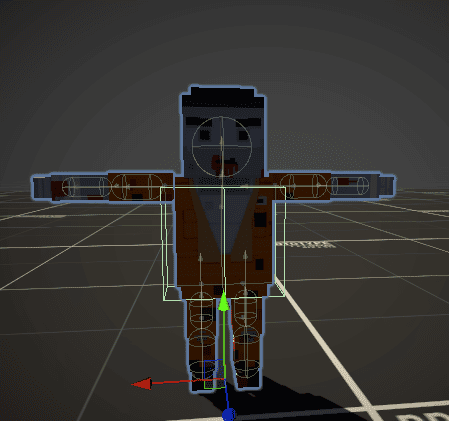
After you click the “Create” button, you should see that your character has colliders. You may need to adjust the colliders’ size or the joints’ rotation.
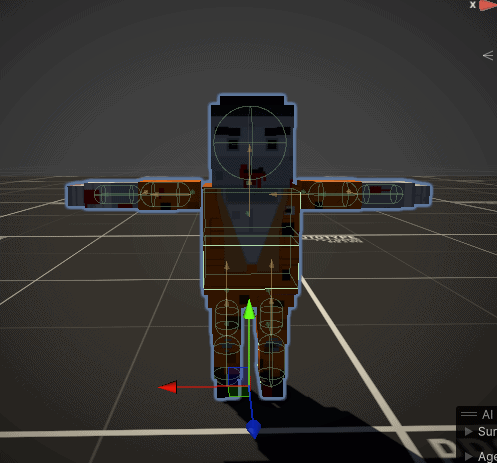
Note: Make sure there is enough space between colliders so that the limbs move correctly. The second image below is of the ragdoll after I modified the colliders. You will notice the chest, hips, and head colliders needed to be adjusted compared to what was generated by the wizard.
Step 2 – Save the Ragdoll as a prefab
If you don’t already have a prefabs folder in your projects directory structure, create one now. Next, drag from the hierarchy to the Prefab folder you just created. This will create a prefab of your ragdoll so we can spawn it into the scene when needed. You will notice the zombie object turned blue in the Hierarchy; this means it is now a prefab. You can delete it from the scene.

Next, drag your non-rag-dolled character into the scene and select it in the Hierarchy. In the “Inspector” click on the “Add Component” button and add a new script called RagdollSpawner.
Step 3 – Write The Code To Spawn The Ragdoll
The RagdollSpawner script handles instantiating the ragdoll prefab, matching its position/rotation, applying forces, and managing cleanup.
Let’s walk through the key sections:
// SerializeField allows us to expose fields to the inspector
[SerializeField] private Transform ragdollPrefab;

// References to animated zombie and force transform
public Transform animatedZombie;
public Transform forceTransform;

// Configurable force options
public float forceAmount = 10f;
public ForceMode forceMode = ForceMode.Impulse;

// Reference to spawned ragdoll
private Transform ragdollTransform;
Here, we declare references needed for ragdoll spawning and force application. ragdollPrefab links to the prefab asset. forceTransform will be used to direct the physics forces. Other variables tune the force behavior.
void Update() {

  // Check for spacebar to trigger ragdoll
  if (Input.GetKeyDown(KeyCode.Space)) {
      SpawnRagdoll();
  }

}

private void SpawnRagdoll() {

  // Instantiate ragdoll at animated zombie's position/rotation
  ragdollTransform = Instantiate(ragdollPrefab,
                                animatedZombie.position,
                                animatedZombie.rotation);

  // Copy animated zombie's pose to ragdoll
  MatchPose(ragdollTransform, animatedZombie);

  // Apply force impulse to ragdoll
  ApplyForceToRagdoll();

}
On spacebar, we call SpawnRagdoll(). This instantiates the ragdollPrefab, matches its transform to the animated zombie, and applies physics forces to push it realistically.
private void SpawnRagdoll()
    {
        // Instantiate the ragdoll at the animated zombie's position
        ragdollTransform = Instantiate(ragdollPrefab, animatedZombie.position, animatedZombie.rotation);

        // Match the ragdoll's pose to the current pose of the animated zombie
        MatchPose(ragdollTransform, animatedZombie);

        // Calculate the height offset from the force position
        float heightOffset = forceTransform.position.y - ragdollTransform.position.y;

        // Apply the height offset to the zombie's position to get the force application point
        Vector3 forceApplicationPoint = new Vector3(ragdollTransform.position.x, ragdollTransform.position.y + heightOffset, ragdollTransform.position.z);

        // Visualize the force direction with a line
        Debug.DrawLine(forceTransform.position, forceApplicationPoint, Color.red, 15f);

        // Apply force to the ragdoll
        ApplyForceToRagdoll(ragdollTransform, forceAmount, forceTransform, forceRadius, forceMode);
    }
The MatchPose() and ApplyForceToRagdoll() methods handle the pose transfer and force application logic, respectively.
private void MatchPose(Transform ragdoll, Transform animatedModel)
   {
       foreach (Transform ragdollPart in ragdoll)
       {
           Transform correspondingPart = animatedModel.Find(ragdollPart.name);
           if (correspondingPart != null)
           {
               ragdollPart.position = correspondingPart.position;
               ragdollPart.rotation = correspondingPart.rotation;
           }
       }
   }
The MatchPose() method copies the current pose from the animated zombie to the spawned ragdoll.
It loops through each child transform in the ragdoll and attempts to find the corresponding transform on the animated zombie by name. If found, it copies over the position and rotation to make the ragdoll match the animated zombie’s pose.
This ensures the ragdoll doesn’t spawn in a default T-pose and instead continues the correct animation pose from the moment of death. This makes the transition between animated zombie and spawned ragdoll seamless.
private void ApplyForceToRagdoll(Transform ragdoll, float forceAmount, Transform forceTransform, float forceRadius, ForceMode forceMode)
    {
        // Calculate the height offset from the force position
        float heightOffset = forceTransform.position.y - ragdoll.position.y;

        foreach (Rigidbody rb in ragdoll.GetComponentsInChildren<Rigidbody>())
        {
            // Apply the height offset to each ragdoll part position
            Vector3 forceApplicationPoint = new Vector3(rb.position.x, rb.position.y + heightOffset,     rb.position.z);

            // Calculate the direction of the force
            Vector3 forceDirection = (forceApplicationPoint - forceTransform.position).normalized * forceAmount;

            if (forceMode == ForceMode.Impulse)
            {
                // Apply the force at the adjusted force application point
                rb.AddForceAtPosition(forceDirection, forceApplicationPoint, forceMode);
            }
            else if (forceMode == ForceMode.Force)
            {
                // Apply the force at the adjusted force application point and includng upward modifier
                rb.AddExplosionForce(forceAmount, forceTransform.position, forceRadius,3f);
            }
            else
            {
                // For other force modes, you can still apply the force normally
                rb.AddForce(forceDirection, forceMode);
            }
        }
    }
The ApplyForceToRagdoll() method applies a physics force to the ragdoll to propel it realistically based on the collision.
First, it calculates a height offset between the force transform and ragdoll. This adjusts the force direction to account for differences in height.
Next, it loops through all the rigidbody components on the ragdoll and its children. For each one, it calculates an adjusted force application point using the height offset.
Then the direction of force is computed by subtracting the force transform position from the application point. This points the force accurately. The direction is normalized and multiplied by forceAmount to scale the force.
Finally, AddForceAtPosition() is used to apply an impulse force precisely at the computed application point and along the desired direction.
This loops through all the ragdoll’s rigidbody parts, offsetting the application point vertically and directing forces to propel the ragdoll realistically based on the collision transform’s position and orientation.
The force mode can also be tweaked via the inspector for effects like continuous force overtime versus instant impulse.
Step 4 – Spawn Some Ragdolls
With your zombie selected in the Hierarchy, drag your ragdoll prefab and the non-ragdoll zombie into the appropriate fields on the Ragdoll Spawner script in the inspector. You will also need to create an object to act as the force position. This will allow you to easily apply force to the zombie from different directions in the editor. Feel free to adjust the radius, force amount, and mode to see how it impacts the ragdoll.
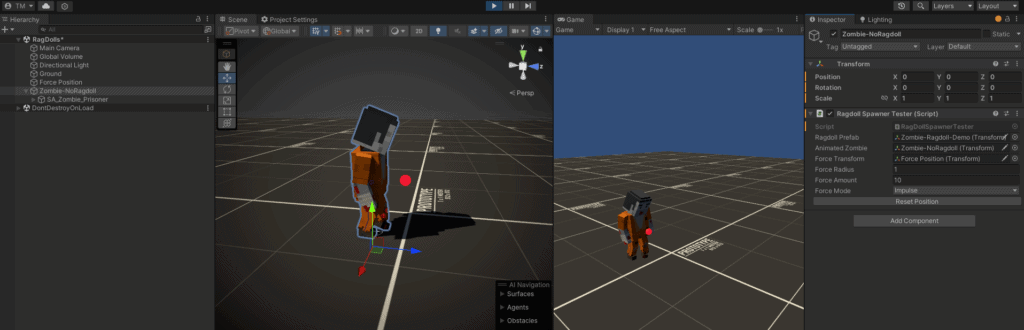
Once you fill in the required fields and position force how you want it, click on play in the button in unity and then hit the space bar. You should see something similar to video below.
And there you have it – an optimized ragdoll system to add over-the-top physics-driven death effects to hordes of enemies without destroying game performance!
By utilizing ragdolls on-demand, we keep the desired randomness and variety of physics-powered deaths, without the continuous performance hit of hundreds of active ragdolls.
The key points are:
- Ragdolls provide more dynamic deaths than animations alone
- Spawning ragdolls temporarily only on death is optimized
- Taking a snapshot of position/rotation enables seamless transition
- Applying forces propels the ragdolls realistically
- Disabling/destroying them afterward keeps performance solid
With these concepts, you can implement similar systems to have hordes of enemies ragdolling dramatically upon death in an optimized way.
I hope this was helpful for anyone wanting to add responsive, personalized physics deaths to tons of enemies without compromising performance. Let me know if you end up expanding on these ideas in your own projects!