Table of Contents
Learning game development is like learning to ride a bike. You don’t start by doing wheelies or racing downhill; you start with the basics.
And today, that’s precisely what we will talk about: What is the minimum coding you need to know to start making games in Unity? Yep, that’s right—no need for a computer science degree or ten years of coding experience.
This post covers the most fundamental coding skills you’ll need, focusing on what’s essential for making a game in Unity.
We’ll also touch upon Unity-specific programming, including topics like MonoBehaviours, GameObjects, and events. For those of you who don’t want to code, don’t worry! We’ll even explore visual scripting.

The Coding Skills You Need
You don’t have to be a coding genius to make cool stuff in Unity. I promise. You just need a solid grip on some fundamentals. First up? Variables.
Variables
Think of variables as little storage lockers for your data. It’s as simple as that. You’ve got different lockers for different kinds of stuff, and you’ll use variables all the time.
Variables are the building blocks of your code, acting like containers to store data.
Understanding Different Data Types
Alright, so you’ve got a few types of data to work with:
Integers (int): Just whole numbers. Use them for stuff like counting your player’s lives or their score.
int playerLives = 3;
int highScore = 1000;
Floats (float): These have decimal points. Great for things like speed or time.
float speed = 5.5f;
float timer = 0.0f;
Strings (string): Anything text goes here. Player names, dialogue, you name it.
bool isPaused = false;
bool hasWon = true;
How to Declare and Use Variables
Declaring a variable is easy. Just tell C# what kind of variable you want, give it a name, and you’re good to go. You can even set its value right away. Check this out:
// Declare the variable
int playerScore;

// Set the variable
playerScore = 0;

// Use it
playerScore = playerScore + 10;
Or, do it all in one shot:
// Declare and set in one go
int playerScore = 0;
See? That was easy, right?
Conditionals
Think of conditionals like the decision-makers in your game. Should the player get an extra life? Should a door open or stay locked? Conditionals help you make those calls.
The Use of if-else Statements
So here’s how it works: you use if to check a condition. If it’s true, some code runs. Simple. But what if you want other options? That’s where else and else if come into play. If if doesn’t trigger, then else or else if gets processed next.
Here’s the basic syntax:
if (condition)
{
    // This block runs if the condition is true
}
else if (anotherCondition)
{
    // This runs if the first condition is false but anotherCondition is true
}
else
{
    // This runs if none of the above conditions are true
}
Simple Example in a Game Setting
bool pressurePlateActivated = true;
bool doorIsLocked = true;

if (pressurePlateActivated && !doorIsLocked)
{
    // Open the door
    Debug.Log("Door is now open!");
}
else if (pressurePlateActivated && doorIsLocked)
{
    // Give a hint to find the key
    Debug.Log("The door is locked. Find the key!");
}
else
{
    // Do nothing
    Debug.Log("Nothing happens.");
}
In this example, the door opens if the pressure plate is activated and the door isn’t locked. Otherwise, it either gives a hint to find the key or does nothing.
Conditionals are your game’s decision-makers. Get them down, and you’re already halfway to being a Unity pro.
Loops
Okay, so we’ve covered variables and conditionals. Now it’s time to cover loops! These bad boys let you run a chunk of code repeatedly. It’s handy when doing repetitive tasks, like moving a bunch of enemies.
Explanation of for and while Loops
First off, there are a couple of types of loops you’ll use: for and while.
for Loops: These are like your well-planned vacation. You know when it starts, when it ends, and what you’re doing each day.
for (int i = 0; i < 10; i++)
{
  // This code runs 10 times
}
while Loops: These are like binge-watching a series. You start watching and keep going until you hit a condition that tells you to stop.
while (someCondition)
{
  // This code runs as long as someCondition is true
}
How They Are Used in Game Development
Alright, let’s talk real-world game dev.
forLoop Example: Imagine a wave of enemies coming at your player. You can use aforloop to move them all toward the player at once.
for (int i = 0; i < enemies.Length; i++)
{
  enemies[i].MoveTowardsPlayer();
}
while Loop Example: Let’s say your game has a day-night cycle. You can use a while loop to keep the cycle going as long as the game is active.
while (gameIsActive)
{
  UpdateDayNightCycle();
}
Loops efficiently handle repetitive tasks in your code, saving you time and effort. Understanding them well will make your development process much more manageable.
Unity-Specific Programming
Now that we’ve got the basics of C# down, let’s talk about Unity-specific stuff. Unity comes with a powerful framework that allows you to interact with the game engine, and the cornerstone of this is MonoBehaviour.
MonoBehaviour is a base class that every Unity script derives from. It gives you access to many useful methods and events that handle everything from initialization to game logic.
The Start() and Update() Methods

Screen shot of in Rider editor of Start and Update methods
Two of the most frequently used MonoBehaviour methods are Start() and Update():
Start(): This method runs once when your game object is created. Use it for initial setup, like setting initial values for variables or activating game components.Update(): This one runs once per frame. It’s your go-to for anything that changes over time, like player movement or score updates.
These methods are essential for controlling the behavior of your game objects and are automatically recognized by Unity, so you don’t have to call them explicitly.
Other Lifecycle Methods You May Use
Unity offers other lifecycle methods that can be useful for more specific tasks:
Awake(): This is likeStart(), but it runs before anyStart()methods. Useful for setting up references between scripts.FixedUpdate(): Similar toUpdate(), but it runs at a consistent rate. Ideal for physics-based movement.OnDestroy(): This method is called when a game object is destroyed, useful for cleanup tasks.
Understanding MonoBehaviour and its methods will give you a strong foundation in Unity game development.
GameObjects and Components

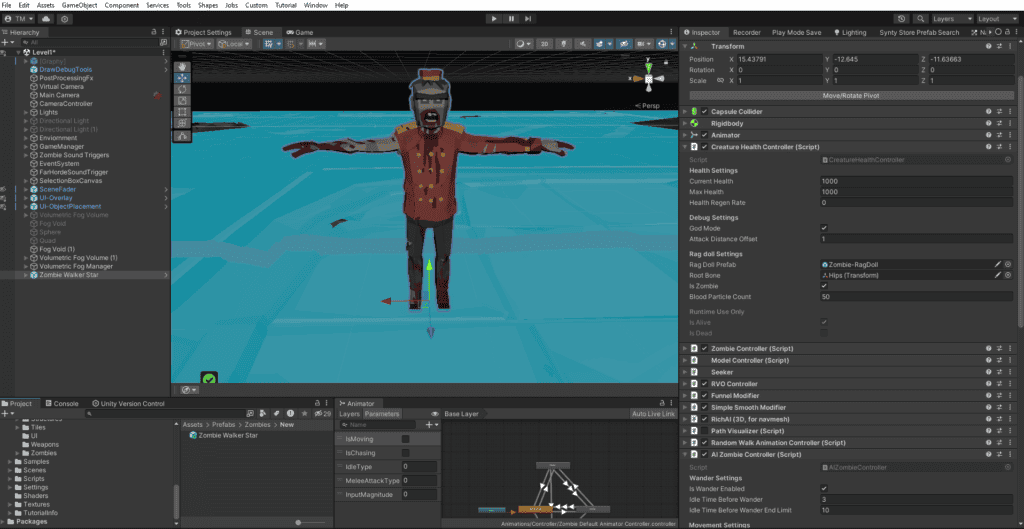
Example of a zombie selected in the hierarchy while looking at the Health Controller Component.
To quickly recap, GameObjects are the foundational elements in your Unity scenes, while Components give those GameObjects functionality. Understanding how to manipulate them is crucial for any Unity developer.
Basic Manipulations: Translation, Rotation, and Scaling
Remember, you can control the position, rotation, and size of your GameObjects directly through code:
- Translation: To move an object, adjust its
Transformcomponent. - Rotation: Rotation is done similarly, also via the
Transformcomponent. - Scaling: To resize an object, modify its
localScale.
transform.position = new Vector3(0, 0, 0);

transform.rotation = Quaternion.Euler(0, 0, 0);

transform.localScale = new Vector3(1, 1, 1);
Events and Listeners
Now let’s switch gears and talk about Events and Listeners, another set of handy tools in Unity game development.
Basic Idea and Why They Are Useful
Events and Listeners help you manage actions and reactions in your game. In simple terms, an event is a signal that something has happened, like a button being clicked. A listener is the part of your code that waits for this signal and then does something in response.
Using Events and Listeners can make your code cleaner and more modular. It allows you to separate the logic for when something happens from the logic of what should happen next.
Events are incredibly powerful for decoupling your code, making it easier to manage as your game grows.
Quick Example of Setting Up a Simple Event
Let’s see how you could set up a simple event in Unity using C#. Suppose we want to notify other parts of our game when the player collects a coin:
1. First, define the event.
public static event Action OnCoinCollected;2. Trigger the event when a coin is collected.
private void CollectCoin()
{
    // Collect the coin
    OnCoinCollected?.Invoke();
}
3. Now, set up a listener to respond when the event is triggered.
private void OnEnable()
{
    // Subscribe to the event
    OnCoinCollected += DoSomething;
}

private void OnDisable()
{
    // Unsubscribe to avoid memory leaks
    OnCoinCollected -= DoSomething;
}

private void DoSomething()
{
    // This will run when the coin is collected
    Debug.Log("Coin collected!");
}
With this setup, whenever a coin is collected, the OnCoinCollected event fires, and any listeners subscribed to this event will execute their actions—in this case, printing “Coin collected!” to the console.
Libraries and APIs
As you get more comfortable with Unity and C#, you’ll start tapping into Libraries and APIs to speed up your game development process. These tools are collections of pre-written code that handle common tasks, so you don’t have to write everything from scratch.
Unity’s Standard Libraries
Unity comes packed with a bunch of standard libraries. They offer functionality ranging from basic math operations to complex AI behavior. Libraries like UnityEngine, System.Collections, and UnityEditor are just a few examples you’ll use often.
using UnityEngine;
using System.Collections;
By including these libraries, you gain quick access to a wealth of functionality that Unity provides.
Common APIs You Might Interact With
Outside of Unity’s ecosystem, you might interact with third-party APIs for various functionalities—think multiplayer support, in-app purchases, or analytics. APIs like Google Play Services or the Unity Ads API are commonly integrated into Unity games.
Visual Scripting: No Coding Required
Coding isn’t the only way to make a game in Unity. Enter Visual Scripting, an approach that lets you create game logic without writing a single line of code.
What Visual Scripting Is
Visual Scripting is essentially programming through a graphical interface. You drag and drop blocks that represent different functionalities and connect them to create your game logic.
Popular Tools like Bolt or Unity’s Visual Scripting
Unity’s Visual Scripting tool is based on Bolt, a popular visual scripting tool they acquired. This integrated feature allows you to drag and drop blocks of logic right within the Unity editor. Being an official part of Unity, it’s well-supported and offers tight integration with other Unity features.
Why Some People Prefer It
Visual Scripting has its advocates for several reasons:
- Easier to Learn: It’s often more intuitive for beginners or those without a coding background.
- Faster Prototyping: You can quickly test ideas without getting bogged down in syntax.
- Collaboration: It makes it easier for designers and artists to contribute to the game logic without learning how to code.
While visual scripting is convenient, it may not offer the same level of control and optimization as traditional coding.
Resources to Learn More
By now, you’ve got a good grasp of what it takes to start Unity game development.
But hey, learning never really stops, right?
Whether you’re into coding or more inclined towards visual scripting, there are tons of resources to help you level up your game—literally!
Essential Game Development Resources

One solid list of resources you shouldn’t miss is over at 70+ Excellent Game Development Resources You Must Have.
It covers many of the Game dev resources I used when learning game development and building my game Last Stand.
Final Thoughts
Alright, that’s a wrap! We’ve covered a lot of ground—from the fundamentals of C# like variables, conditionals, and loops, to Unity-specific magic with MonoBehaviour, GameObjects, and Components. We also dipped our toes into more advanced stuff like Events, Libraries, APIs, and even explored the no-code route with Visual Scripting.
Your Unity Journey Starts Now
If you’ve read this far, you’re more than equipped to start your own journey into Unity game development. Remember, you don’t need to be a coding wizard to make something awesome. The tools are right at your fingertips, and there’s no time like the present to get started.

Call to Action
I’d love to hear about your Unity adventures or any questions you might have—so feel free to drop a comment below. If you found this post helpful, why not share it with others? And while you’re here, don’t forget to check out my Blog for more invaluable tips and tricks.

