Scene faders provide smooth visual transitions when loading new scenes in Unity games. This tutorial covers how to create a simple scene fader in Unity by scripting a UI image to gradually fade to black, load the next scene, and fade back in. We will set up a SceneFader object, write fade in/out coroutines to control the transitions and connect the fader to scene loading. Using this approach will polish and enhance scene changes in your games.
Table of Contents
Step 1: Creating the UI Image for the Fader
First, let’s create a new game object to hold our SceneFader.
- Right-click in the hierarchy and select Empty Game Object. Rename it to SceneFader.
- Next, click on the SceneFader object and right-click, select UI, and then Image. This is going to be an Image component that covers the entire screen.
- Resize the Image to cover the entire screen. You can do this by setting its RectTransform anchors to stretch in horizontal and vertical directions.
- Set the Color of the Image to be fully transparent black: RGBA = (0, 0, 0, 0). This makes the Image invisible by default.
- Create a new script to called SceneFaderController and add it to the SceneFader object as a component by selecting Add Component in the Inspector and typing SceneFader.
Step 2 Coding The ScenFader Controller – Variables
Our SceneFaderController script contains the main logic to control the fade transitions. There are a few key variables we need to set up:
- Image fadeImage: This is a reference to the Image component, so the script can modify the transparency of the color to create fades. We can drag our Scene Fader’s Image from the Hierarchy into this field to link them.
- Float fadeDuration: Controls fade speed in units per second. Higher values mean faster transitions.
- AnimationCurve animationCurve: Defines the progression of the transparency through the fades, allowing for ease in/out effects.
- Color fadeColor: This defines the fade color, which by default is black
With those variables wired up properly in the SceneFader component, our basic fading screen is ready! Next we’ll write the key coroutines that perform the transitions.
public class ScenFaderController : MonoBehaviour
{
    [SerializeField] private Image fadeImage;
    [SerializeField] private float fadeDuration = 1f;
    [SerializeField] private AnimationCurve animationCurve;
    [SerializeField] private Color fadeColor = Color.black;
}
Step 3: Coding The Coroutines and Methods
Coroutines are a special type of method in Unity that allow us to pause execution and continue over multiple frames. We can use them to create smooth fade animations.
The key coroutine and Methods in our SceneFader are:
FadeInEffect() – Private coroutine that fades the image from opaque to fully transparent by lerping transparency from the fadeColor to clear based on the fadeDuration.
FadeOut(string nextScene) – Private coroutine that fades image from transparent to opaque and at the end, loads the specified next scene using SceneManager:
FadeTo(string nextScene) – Public method that starts FadeOut coroutine to fade out and load the given scene
FadeIn() – Public method called on scene start to fade in from opaque by starting FadeInEffect coroutine
Start() – Starts the FadeInEffect coroutine when object initialized to fade in
public class SceneFaderController : MonoBehaviour
{
    [SerializeField] private Image fadeImage;
    [SerializeField] private float fadeDuration = 1f;
    [SerializeField] private AnimationCurve animationCurve;
    [SerializeField] private Color fadeColor = Color.black;

    void Start()
    {
        StartCoroutine(FadeInEffect());
    }

    private IEnumerator FadeInEffect()
    {
        float progress = 1f;

        while (progress > 0f) {
            progress -= Time.deltaTime / fadeDuration;
            float alpha = animationCurve.Evaluate(progress);
            fadeImage.color = new Color(fadeColor.r, fadeColor.g, fadeColor.b, alpha);
            yield return null;
        }
    }

    private IEnumerator FadeOut(string sceneName)
    {
        if (!Application.CanStreamedLevelBeLoaded(sceneName))
        {
            Debug.LogError($"SceneFader: Scene not found - {sceneName}");
            yield break;
        }

        float progress = 0f;

        while (progress < 1f)
        {
            progress += Time.deltaTime / fadeDuration;
            float alpha = animationCurve.Evaluate(progress);
            fadeImage.color = new Color(fadeColor.r, fadeColor.g, fadeColor.b, alpha);
            yield return null;
        }

        SceneManager.LoadScene(sceneName);
    }

    public void FadeTo(string sceneName)
    {
        StartCoroutine(FadeOut(sceneName));
    }

    public void FadeIn()
    {
        StartCoroutine(FadeInEffect());
    }
}
Step 4: Using The SceneFader and Adjusting The Animation Curve
Now that we have our SceneFaderController script set up, it’s time to put it into action and fine-tune the transition effect.
Using the SceneFader
- Scene Setup: To test our SceneFader, let’s set up a basic scenario. Create two scenes in your Unity project. In the first scene, place a button that, when clicked, will trigger the scene transition.
- Button Configuration:
- Add a UI Button to your first scene.
- In the Button component’s OnClick event, add your SceneFader object.
- Choose
SceneFaderController -> FadeTo(string)from the function list. - Type the name of your second scene in the string field.
- Triggering the Transition: Now, when you click the button in your game, it should trigger the fade out, load the second scene, and then fade in.
Adjusting the Animation Curve
In this step, we’ll see how to effectively use the SceneFader for a fade-in effect when a scene loads, and explore how adjusting the animation curve can alter the transition’s feel.
Implementing the SceneFader for Fade-In
- Adding SceneFader to Your Scene: Place the SceneFader object in your scene. This can be done by dragging the SceneFader prefab into your scene hierarchy.
- Automatic Fade-In on Scene Load:
- The
Start()method in ourSceneFaderControllerscript automatically initiates a fade-in effect when the scene loads. - Ensure the script’s public variables (like
fadeDurationandfadeColor) are set to your desired values in the Unity Editor.
- The
- Testing the Fade-In: Enter Play mode in Unity. Your scene should start with a fade-in effect from black (or your chosen fade color) to the scene’s normal view. This adds a polished, professional touch right from the start.
Adjusting the Animation Curve
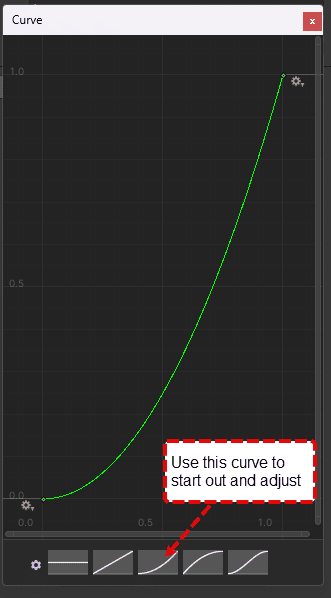
The AnimationCurve in our script controls the pace and style of the fade transition. Here’s how to tweak it:
- Curve Editing:
- Select the SceneFader object in the Inspector.
- Locate the
AnimationCurveproperty. Click on the curve to open the editor.
- Understanding Curve Dynamics:
- The curve editor displays a graph where the horizontal axis represents time and the vertical axis represents the fade’s intensity.
- By default, the curve is a straight diagonal line, indicating a uniform fade.
- Customizing the Curve:
- Try different shapes. Here’s what they do:
- Fast Start: Curve steeply rising at the beginning makes the fade-in quick initially, then slow down.
- Slow Start: A gradual incline at the start creates a slow fade-in, becoming faster towards the end.
- S-Curve: This gives a slow start and end with a quicker middle phase, adding a dynamic feel.
- Try different shapes. Here’s what they do:
- Observing Changes: After adjusting the curve, run your scene to see how the fade-in feels. Each curve shape creates a unique visual effect, influencing the mood at the start of your scene.

And there you have it; by integrating the SceneFader into your scenes and experimenting with the animation curve, you’ve added an elegant and customizable fade-in effect to your game’s openings. I hope this was helpful for anyone wanting to add simple scene transitions to your game. Let me know if you end up expanding on these ideas in your own projects!

