Table of Contents
Unity Lifecycle Events are fundamental to game development in Unity. They define the core structure of how scripts run and interact within the game environment. Understanding these events is crucial for novice and seasoned developers, as they are integral to creating responsive, efficient, and well-structured games.
In this tutorial, we’ll dig into these key lifecycle events – Awake, Start, OnEnable, OnDisable and Update. Each of these events plays a unique role in the lifecycle of a Unity script, and knowing when and how to use them can significantly impact the performance and behavior of your game.
We will use an Item Collection Game as a simple yet effective example to demonstrate how Unity’s Lifecycle Events are used in real-world game development scenarios. The game was developed specifically for this tutorial.
We’ll explore how these events interact with each other, their execution order, and common pitfalls to avoid, such as the well-known issue with GetComponent() in the Start() method. Additionally, we’ll cover best practices for subscribing and unsubscribing to events and managing physics calculations effectively.
Setting Up The Game Manager

To begin, you need to create a new Scripts Folder. Inside that folder, you should create another folder and name it “Core“. Then, within the “Core” folder, you should create a new c# class and name it “GameManager“. This class is responsible for managing the state of the game, which specifically includes the score.
The Singleton pattern is a design approach in programming used to ensure that a class has only one instance while providing a global point of access to it. This pattern is particularly useful in scenarios like game development where specific components, such as a GameManager, should only exist once.
How It Works:
- When
GameManager.Instanceis called, it checks ifinstanceis null. - If
instanceis null (no GameManager exists), it creates a newGameManagerand stores it ininstance. - If
instanceis not null (a GameManager already exists), it simply returns the existing instance. - This ensures that throughout your game, there is always at most one
GameManager.
public class GameManager : MonoBehaviour
{
    public event Action<int> OnScoreChanged;
    private static GameManager instance = null;
    private int score = 0;

    public static GameManager Instance
    {
        get
        {
            if (instance == null)
                instance = (GameManager)FindObjectOfType(typeof(GameManager));
            return instance;
        }
    }

    public void ItemCollected() {
        score++;
        Debug.Log("Score: " + score);
        OnScoreChanged?.Invoke(score);
    }
}
Caution
While the Singleton pattern is powerful and useful, it’s important to use it judiciously. Overuse can lead to issues like increased coupling between classes or difficulty in testing. But for specific cases like a game manager in Unity, it’s a fitting choice.
Setting Up The Player Controller
In this part of our tutorial, we will use two of Unity’s key lifecycle events: Awake and Start. While both are used for initialization, their execution timing and use cases differ.
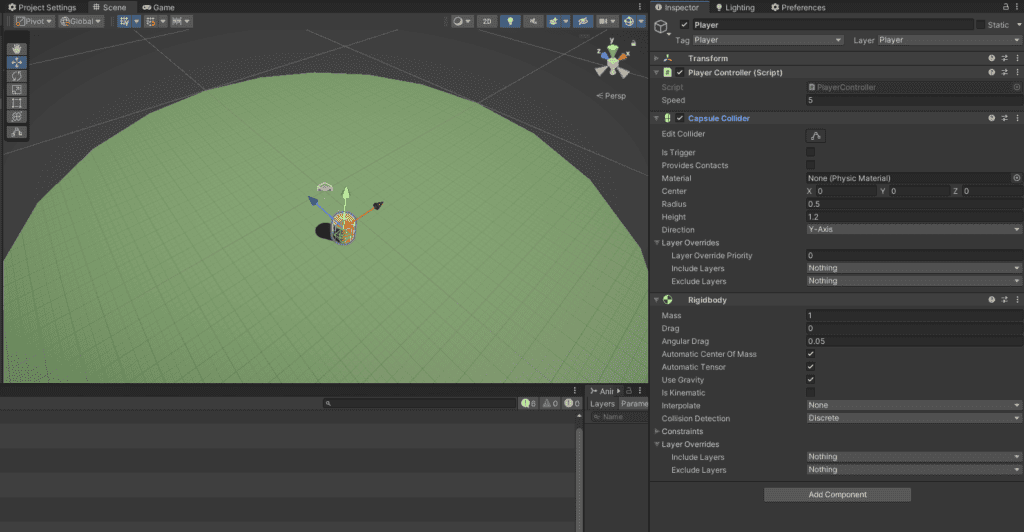
Adding the Player to the Scene:
- Right-click in the Hierarchy panel and select
3D Object > Capsuleto create a new capsule. - With the capsule selected, drag your
PlayerControllerscript onto the Inspector panel to attach it. This capsule represents our player. - Add a
Rigidbodycomponent by clickingAdd Componentin the Inspector and searching forRigidbody. This will allow the capsule to be affected by physics. - Ensure the
Capsule Collideris present, which it should be by default with the capsule.
Configuring Layer and Tag:
- With the player capsule still selected in the Hierarchy, locate the
Layerdropdown at the top of the Inspector. - Click the
Layerdropdown and selectAdd Layer...to create a new layer. Name it “Player” and then assign this layer to the capsule by selecting it from the dropdown. - For the
Tag, click theTagdropdown, chooseAdd Tag..., create a new tag called “Player“, and then assign this tag to the capsule similarly.

Note:
The screenshot above maybe slightly different. I am using the PolyGon Proptype asset from Synty Studios. The concepts are all the same just the visauls may be slightly different.
Integrating Unity Lifecycle Events – Awake, Start, and Update
Awake
- When It’s Called: As soon as a script instance is loaded, which is typically when the game starts or when the object containing the script is created.
- Primary Use: Ideal for initializing variables, setting up references to other components in the same GameObject, and configuring initial states.
- Key Characteristic: It executes regardless of whether the script component is enabled in the inspector. This means even if the component is disabled,
Awakewill still run.
Start
- When It’s Called: Right before the game’s first update cycle, but crucially, after all objects in the scene have run their
Awakemethods. - Primary Use: Suited for setup tasks that need to interact with other objects or components. Since
Awakemethods on all objects are called first, you can safely assume that all other components are also initialized. - Key Characteristic: It only executes if the script component is enabled. If the component is disabled,
Startwill not run.
Recap and Best Practices
- In
Awake: Focus on setting up references to components within the same GameObject. For instance, you might useAwaketo retrieve a reference to a Rigidbody or Collider component attached to the same object. - In
Start: Perform checks or tasks that involve other objects. For example, you might useStartto validate that the references set up inAwakeare not null and interact with components on other GameObjects.
Handling Null Reference Errors
- Common Cause: A null reference error often occurs when using a component that hasn’t been properly initialized or assigned.
- Prevention: Ensure that your component initialization in
Awakeis correctly done. Always check for null inStartbefore using the components. This step is crucial to avoid runtime errors and ensure smooth gameplay mechanics.
Now that we have explained the Start and Awake methods, best practices, and handling null reference errors, let’s set up the PlayerController. Create a new folder called Player in your Scripts folder and a new C# script called PlayerController, and enter the following code.
public class PlayerController : MonoBehaviour
{
    [SerializeField] private float speed = 5.0f;

    private Rigidbody playerRigidbody;

    private void Awake()
    {
        // Initialize components or set default values
        playerRigidbody = GetComponent<Rigidbody>();
    }
    void Start() {

        // Check for null to avoid NullReferenceException
        if (playerRigidbody != null) {
            //adjust rigidbody settings if needed
            playerRigidbody.isKinematic = true;
            playerRigidbody.useGravity = false;
        }
        else
        {
            Debug.LogError("Rigidbody is not attached to the player.");
        }
    }

}
Understanding the Code:
- Awake Method:
- The
Awakemethod is used here for initializing theplayerRigidbodyvariable. This is done by callingGetComponent<Rigidbody>(), which fetches the Rigidbody component attached to the same GameObject. - This is a perfect example of using
Awakefor setting up references to components within the same GameObject.
- The
- Start Method:
- In
Start, there’s a null check onplayerRigidbody. This is a best practice to avoidNullReferenceException. SinceStartis called afterAwake, we can be confident that any initialization that was supposed to happen inAwakehas been done. - The method then configures the Rigidbody. This configuration requires the component to be non-null, hence the null check. If the Rigidbody is missing, a clear error message is logged.
- In
New Concepts Applied:
- Component Initialization in Awake: The script demonstrates the initialization of components (
Rigidbodyin this case) inAwake. - Null Checking in Start: It showcases the importance of checking for null in
Startas a precaution against missing components. - Error Handling: By using
Debug.LogError, the script provides clear feedback in case of issues, which is a good practice for debugging and development.
Update
The Update method is where we handle real-time user input and update our game objects accordingly. It is the perfect place to handle real-time input and other updates that are dependent on each frame. Let’s look at how the player’s movement is processed:
void Update() {
        float horizontalInput = Input.GetAxis("Horizontal");
        float verticalInput = Input.GetAxis("Vertical");
        Vector3 movement = new Vector3(horizontalInput, 0, verticalInput);
        transform.Translate(movement * speed * Time.deltaTime);
    }
Understanding the Code:
The Update method is where we handle real-time user input and update our game objects accordingly. Let’s look at how the player’s movement is processed:
float horizontalInput = Input.GetAxis("Horizontal");- Retrieves the player’s horizontal movement input from either a keyboard or a gamepad. The
Input.GetAxismethod is particularly useful for creating smooth movement transitions due to its in-built input smoothing.
float verticalInput = Input.GetAxis("Vertical");- Captures the vertical movement input in a similar fashion. This lets the player move forwards or backwards.
Vector3 movement = new Vector3(horizontalInput, 0, verticalInput);- Constructs a 3D vector from the horizontal and vertical inputs. The y-axis value is zero because in this context, we do not want the player moving upwards or downwards.
transform.Translate(movement * speed * Time.deltaTime);- Moves the player in the direction of the
movementvector. Multiplying byspeedallows us to control the movement’s pace, and incorporatingTime.deltaTimeensures that this movement is consistent across different frame rates. This is crucial because withoutTime.deltaTime, the player’s speed would vary with the hardware’s performance.
Setting Up The UIManager to Display the Score
In this section, we’ll set up the UIManager. The UIManager updates and displays the game’s user interface, such as the score.
Adding the UIManager to the Hierarchy:
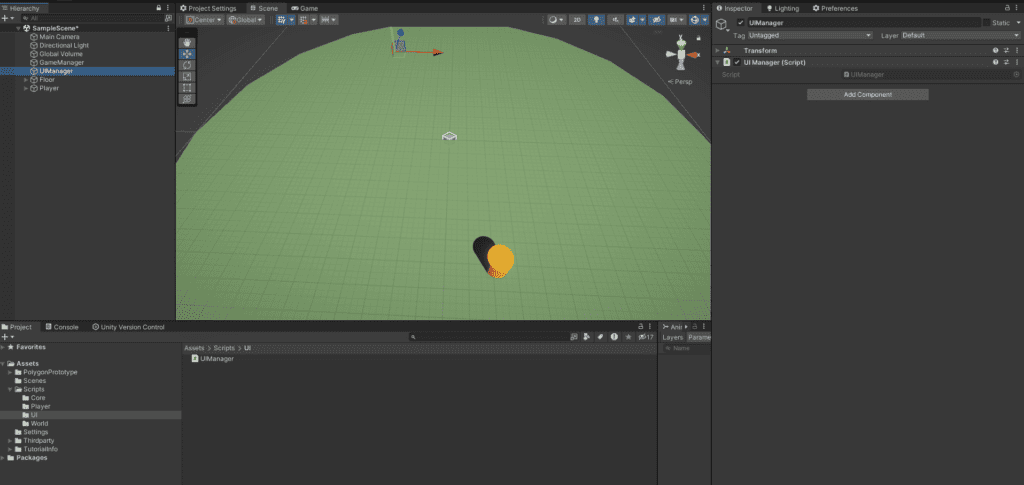
- Right-click in the Hierarchy and create an empty game object.
- Next Create a Script called UIManager.
- Attach your
UIManagerscript to the canvas by dragging the script onto the canvas in the Inspector.

Integrating OnEnable and OnDisable into the UIManager
OnEnable
- The
OnEnablemethod is called when the object becomes active. Here, we subscribe to theOnScoreChangedevent of theGameManager. This ensures that ourUpdateScoreUImethod is called whenever the score changes.
OnDisable
- Conversely,
OnDisableis called when the object becomes inactive. It’s important to unsubscribe from events when the object is disabled to prevent potential memory leaks or unexpected behavior.
Recap and Best Practices
- Always pair your event subscriptions in
OnEnablewith unsubscriptions inOnDisable. - This helps manage event listeners efficiently and avoids issues related to objects that are no longer active.
Errors to Watch For
- Ensure that
GameManageris not null before subscribing or unsubscribing to avoidNullReferenceException.
UIManager Code Breakdown
public class UIManager : MonoBehaviour
{
    private int score = 0;
    void OnEnable() {
        GameManager.Instance.OnScoreChanged += UpdateScoreUI;
    }

    void OnDisable() {
        if (GameManager.Instance != null ) {
            GameManager.Instance.OnScoreChanged -= UpdateScoreUI;
        }
    }

    void UpdateScoreUI(int newScore) {
        // Update the UI with the new score
        score = newScore;
        Debug.Log("Score: " + score);
    }

    private void OnGUI()
    {
        //draw label with score
        GUI.Label(new Rect(10, 10, 100, 20), "Score: " + score);
    }
}
Understanding the Code:
OnEnableandOnDisable: Manage the subscription and unsubscription to theOnScoreChangedevent from theGameManager.UpdateScoreUI: A method that updates the internalscorevariable and logs the new score.OnGUI: A Unity callback method used here to draw the score label on the screen.
In this tutorial, I’ve used the
OnGUIOnGUImethod to draw the score label directly onto the screen for simplicity and demonstration purposes. However, it’s important to note thatOnGUIis an older Unity method and can be less efficient, especially for complex UIs or games intended for production.
For a proper game, especially one you plan to release, it’s recommended to use the UI system provided by theCanvasGameObject.
New Concepts Applied:
- Event Subscriptions: We’ve applied the concept of subscribing to an event when the UI component is enabled, and correspondingly unsubscribing when disabled.
- Unity UI Elements: The UIManager interacts with UI elements such as text to display the score.
- Debugging: The use of
Debug.Logto print out information for debugging purposes.
Setting Up Collectible Items In The Game
In this part of the tutorial, we will create the collectible items that the player can gather to increase their score.
Creating the Item Prefab:
- Add a Primitive Cube:
- Right-click in the Hierarchy panel and select
3D Object > Cubeto create a new cube. - Rename this cube to “Item” to distinguish it as a collectible object.
- Right-click in the Hierarchy panel and select
- Adjust the Cube (Optional):
- In the Inspector panel, you can adjust the size, position, and rotation of the cube to fit your game’s design.
- Tag the Cube:
- With the cube selected, go to the Tag dropdown in the Inspector and click
Add Tag.... - Create a new tag called “Item” and then assign this tag to the cube.
- With the cube selected, go to the Tag dropdown in the Inspector and click
- Place the Items:
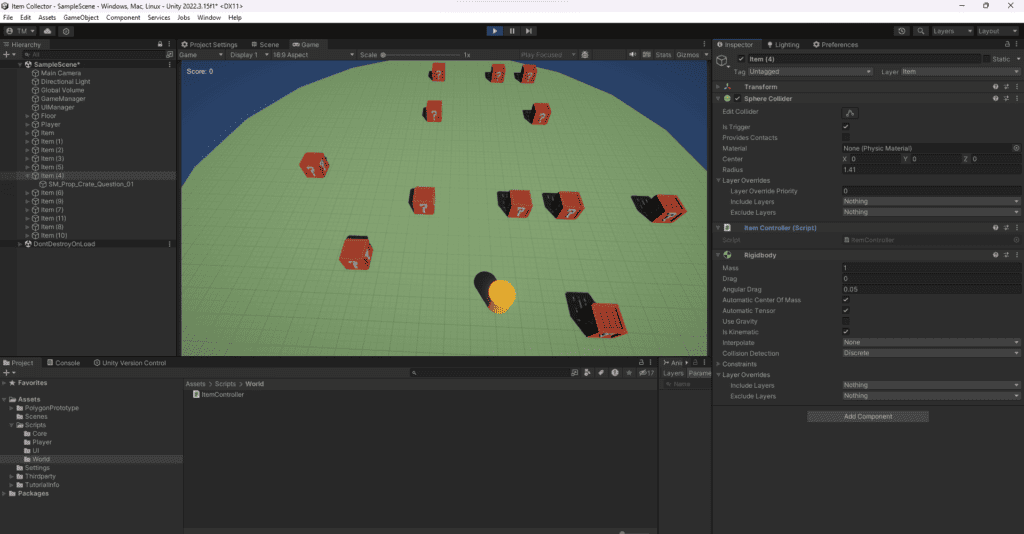
- Copy and paste the Item prefab around your scene where you want the collectibles to be located.
Configuring the ItemController Script:
- Attach the Script:
- Drag the
ItemControllerscript onto your Item prefab in the Assets folder. This ensures all instances of the item have the script attached.
- Drag the
- Set Up the Collider:
- Ensure that the cube has a
Collidercomponent and set it to be a trigger. This
- Ensure that the cube has a

Final Thoughts
Congratulations on completing this introductory Unity tutorial! You’ve taken the foundational steps toward creating an interactive game environment. Let’s recap what you’ve achieved:
- Player Controller: You’ve set up a player-controlled capsule using the
PlayerControllerscript, learning how Unity’sAwake,Start, andUpdatelifecycle methods work together to create smooth and responsive movement. - UI Manager: You’ve implemented a simple UI to display the player’s score, getting familiar with event subscription and unsubscription through the
OnEnableandOnDisablemethods, as well as the use ofOnGUIfor immediate-mode GUI drawing. - Item Controller: You’ve added collectible items into the scene and scripted their behavior to interact with the player and update the game state, understanding the basics of collision detection and game object manipulation.
This tutorial has introduced you to several key concepts in Unity that form the bedrock of game development. You’ve seen firsthand how scripts can bring objects to life, respond to player inputs, and create a sense of progression through a scoring mechanism.
Stay tuned for my next tutorial, where we will take the foundational skills you’ve learned today and expand upon them. We’ll dive into prefabs for efficient game design, add some polish to our game, and introduce exciting new game mechanics.
Keep experimenting, keep learning, and most importantly, have fun creating!
Further Reading and Exploration
If you found this guide helpful and are eager to expand your Unity skills, I have more resources that you might find interesting:
- Time-Based Actions in Unity: Discover how to implement time-based actions in Unity using Coroutines, Invoke, and Timers. This is essential for creating dynamic gameplay and managing events over time. Check it out here.
- Essential Coding Skills for Game Development: New to game development or need a refresher on the basics? My post on the minimum coding knowledge required for effective game development offers a streamlined approach to the essential skills you need. Dive in here.

