This past Christmas brought an exciting surprise – a shiny new Steam Deck courtesy of ol’ Saint Nick.
As an indie developer, this gift represented a special opportunity: bringing my current game project, “Diminishing Light,” to the Steam Deck platform.
Achieving the “Steam Deck Verified” status would be a personal milestone and a signal to users that my game delivers a smooth, optimized experience on the Deck.
The verification process covers robust criteria like seamless controls and performance. Steam provides a checklist outlining the path to verification, which is essential for fine-tuning games to harness the hardware’s full potential.
To deploy my game on the Steam Deck, I will use the SteamOS Devkit Client. This tool bridges my development PC and the Steam Deck, making it easy to deploy my game.
Join me as we explore how to install your Unity game on the Steam Deck.
Table of Contents
Setting Up Your Development Environment
Now that we’re ready to bring a game to Steam Deck setting up our development environment is the first step. This section will cover installing the essential Linux Build Support module in Unity.
To build for Steam Deck, you’ll need the Linux Build Support module:
- Open Unity Hub and navigate to ‘Installs’.
- Find your Unity version and click the three dots to access ‘Add Modules’.
- Select the ‘Linux Build Support’ module. The IL2CPP option is recommended.
- Install the module and wait for completion.

The IL2CPP option translates C# to C++ for improved performance, while Mono uses C# directly for simpler builds. IL2CPP is generally better suited for production builds on Steam Deck.
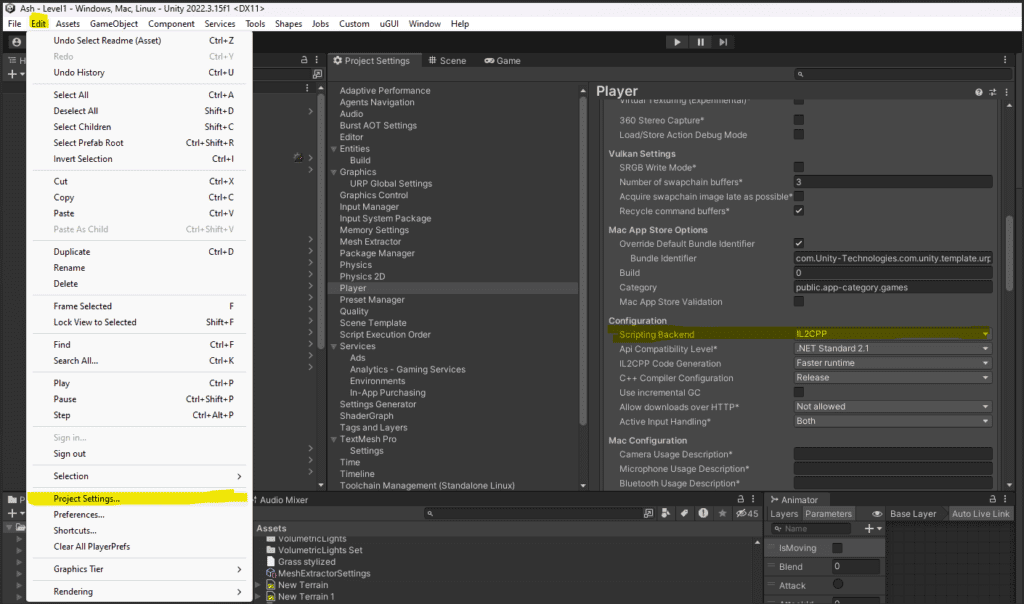
You’ll also want to configure your project to use the IL2CPP scripting backend:
- Click Edit and select Project Settings.
- Under “Player Settings”, find the “Other Settings” panel.
- Change the “Scripting Backend” from Mono to IL2CPP.

With the Linux Build Support module installed and the Scripting Backend set to IL2CPP, your development environment is now ready for Linux and Steam Deck builds. Next, we’ll cover the building process itself.
Building Your Project for Steam Deck Deployment
Next, we will want to build our project so we can deploy our game to the Steam Deck.
- Open Build Settings: In Unity, go to
File>Build Settings. - Select Your Platform: Ensure ‘Linux’ is selected as the Target Platform in the Build Settings window to get a compatible build for the Steam Deck.
- Configure Build Options:
- Set the scripting backend to IL2CPP, which you’ve previously installed.
- Check the ‘Development Build’ box if you want to include debug symbols and enable the Profiler. Otherwise, leave it unchecked for a final release build.
- Add Scenes to Build: Make sure all the scenes you want in the build are checked.
- Build the Project:
- Click on the ‘Build’ button.
- Choose a directory to save your build. Unity will compile the game and save it to this location.
- Wait for the Build to Complete: This could take some time depending on the size and complexity of your project.
- Locate the Build: After Unity finishes, navigate to the directory you chose and verify the build is there.

Once you have your build, you’re ready to move on to deployment. It’s a straightforward process in Unity.
Installing and Using the SteamOS Devkit Client
- Initiate the Install: Use the direct link to begin the installation: Client Download. Clicking the link should open Steam and prompt you to install the client.
- Follow Steam’s Instructions: Once Steam opens, follow the on-screen instructions to complete the installation of the Devkit Client.
Using the SteamOS Devkit Client
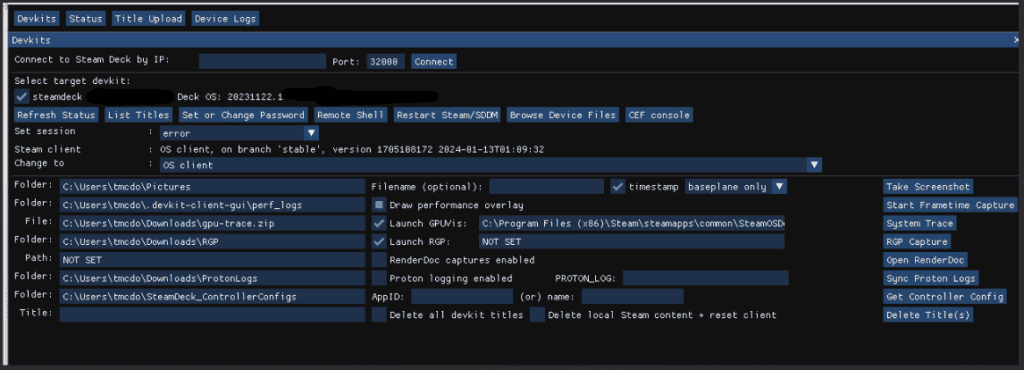
- Connect to the Steam Deck: With the Devkit Client installed, connect your PC and Steam Deck to the same network. Make sure you Enable Developer Mode under the System Settings section on your Steam Deck. Then in Settings > Developer, select Pair new host under the Development Kit section
- Launch the Client: Open the SteamOS Devkit Client on your PC.
- Set Up for Deployment: Follow the detailed guide on Steam’s official documentation to configure the client for game deployment: Steam’s Game Loading Guide. You should see a screen similar to this.

Deploy Your Game To The Steam Deck
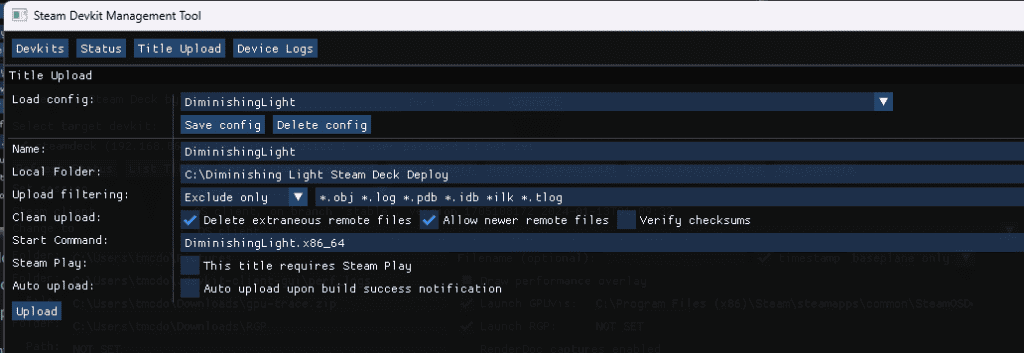
Next, we will use the Devkit Client to deploy the Linux build of your game directly to the Steam Deck. Click on the Title Upload button at the top of the tool. Select the local folder on your PC where the build files are located. You can also enter exclude files for Upload Filtering as seen in the screenshot below. Once the client has been configured, click on the upload button at the bottom of the screen. Your game should be deployed to the Steam Deck if all goes well. It will be listed under the Non-Steam section of your library and labeled DevKit: GameName.

Final Thoughts
This concludes the tutorial on how to install your Unity game on the Steam Deck. We covered:
- Setting up the development environment with Linux Build Support in Unity
- Building the game project with IL2CPP for optimal performance
- Using the SteamOS Devkit Client to install the game on the Steam Deck
Following these steps lets you take a Unity game and run it on the Steam Deck. The tools provided make developing for this platform accessible.
Please share any other tips or experiences in the comments. Unity developers can help each other build and deploy games smoothly.
The Steam Deck opens up new opportunities for gaming on the go. With the right guidance, developers can bring their creative visions to life on this exciting new platform.

